
ZERO-FOLDING PASTEL DE NATA, A HYBRID
Ever since I came back from Lisbon, the question haunts me.
What is a perfect pastel de nata?
Well for me, now more than ever, that depends on who you’re asking.
If you were from the Asian parts of the world as I am, growing up, this wildly popular pastry since the 90’s actually came from, and have always been, more as a Macao thing. Sure it’s known as the Portuguese-style egg tarts from Macao, the former Portugal colony famed for its many Portugal-influenced hybrid foods, but notice that it is NOT called pastel de nada, not even Portuguese egg tart, but ambiguously, “Portugese-STYLE” egg tart. Style? The name itself oozes deniability, suggesting that on one level or another, these tarts can’t be expected as a 100% identical replica of the originals, but a mere adaptation of some sort. Therefore with time, as the popularity of these tarts swept through every bakeries in Hong Kong, Taiwan, and even KFC (yes, they sell these at KFC here…), the Portuguese association sort of fell irrelevant, and the gold standard on what is a great pastel de nata, in Asia at least, is set on however it is made in Macao. And really, most people don’t have a clue on what the real thing is like.
But I’ve always wondered about this. I mean is “Portuguese-style egg tart” even a thing in Portugal? Do people even actually eat this stuff there or is it another freaky fortune cookie-phenomenon? And if they do, the question isn’t if it was the same from Macao, because I know there was no chance in hell that they’re the same. But the question is, how different?
So a couple months ago when I finally visited Lisbon for the first time, I was on a quest for truth. I didn’t know what to expect, but almost as immediately as we landed at the airport, truth no 1 revealed itself. Pastel de nada is definitely a thing in Portugal. I mean, they were everywhere, as common as bagels in NY or surfers in L.A. Well great, fantastic, because it allowed me to conduct an in-depth and thoroughly tasted investigation on truth no 2, which is, how different are the real things from Macao’s? Well, this was where the troubles began. They are, as expected, quite different on many textural levels, and now…
I’m completely torn.
I ASSURE YOU THAT THIS CONCLUSION, WHETHER YOU AGREE WITH IT OR NOT, CAME AFTER MUCH TORMENTS, SELF-REFLECTIONS AND EVEN SOME SOUL-SEARCHING ON WHO I AM AS A SENTIENT PASTRY EATER… (BUT THE ANSWER TO) WHAT IS ULTIMATELY A PERFECT PASTEL DE NATA?
WELL, A HYBRID


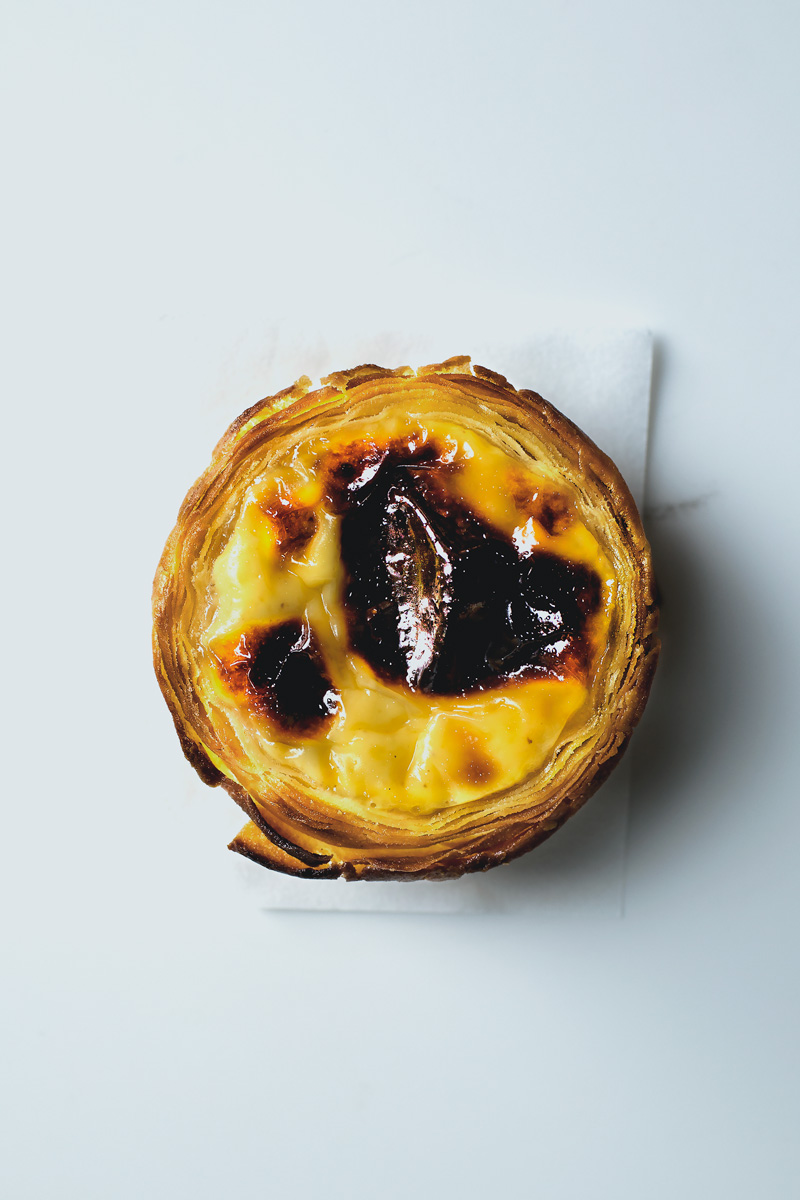
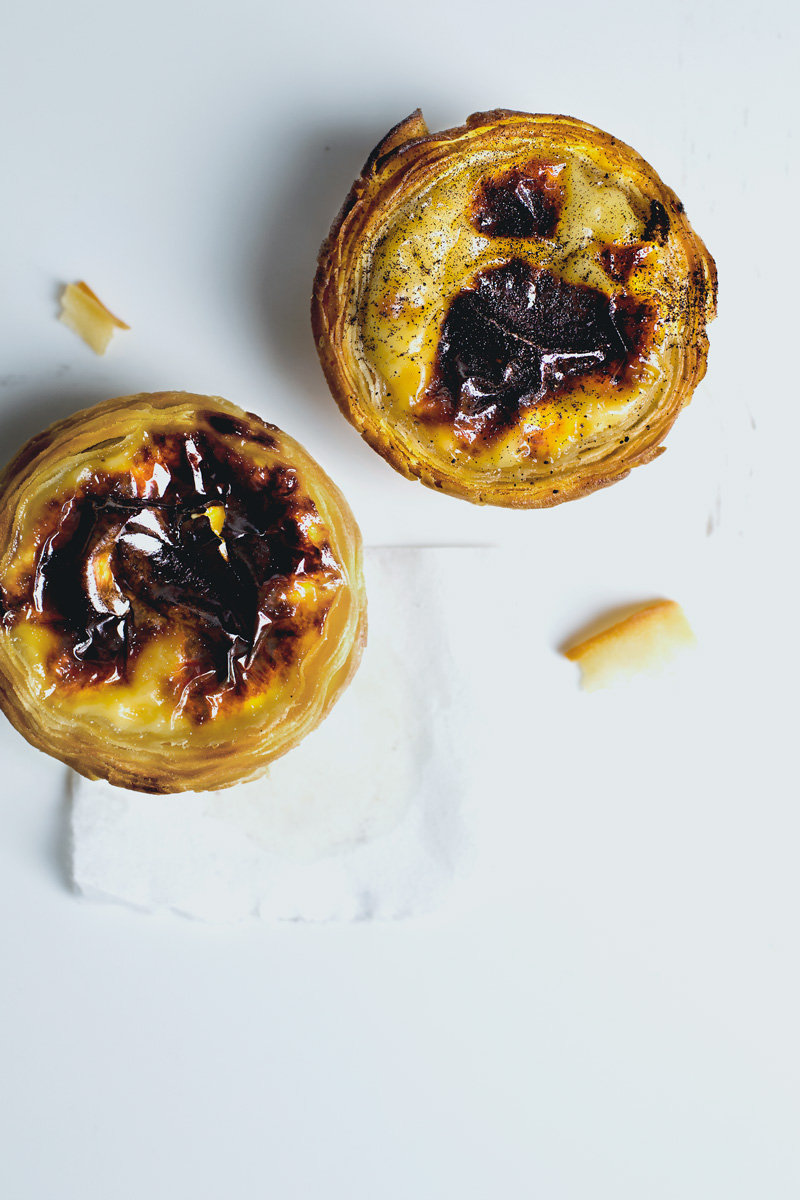
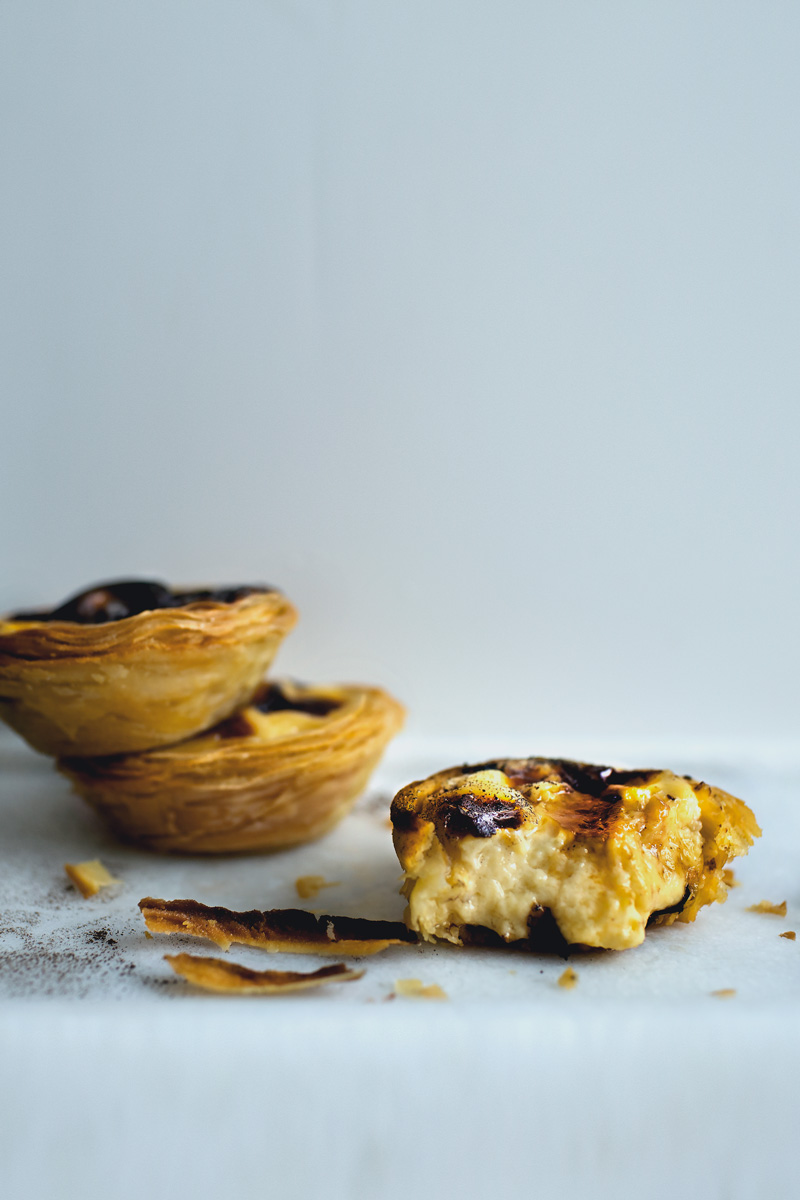
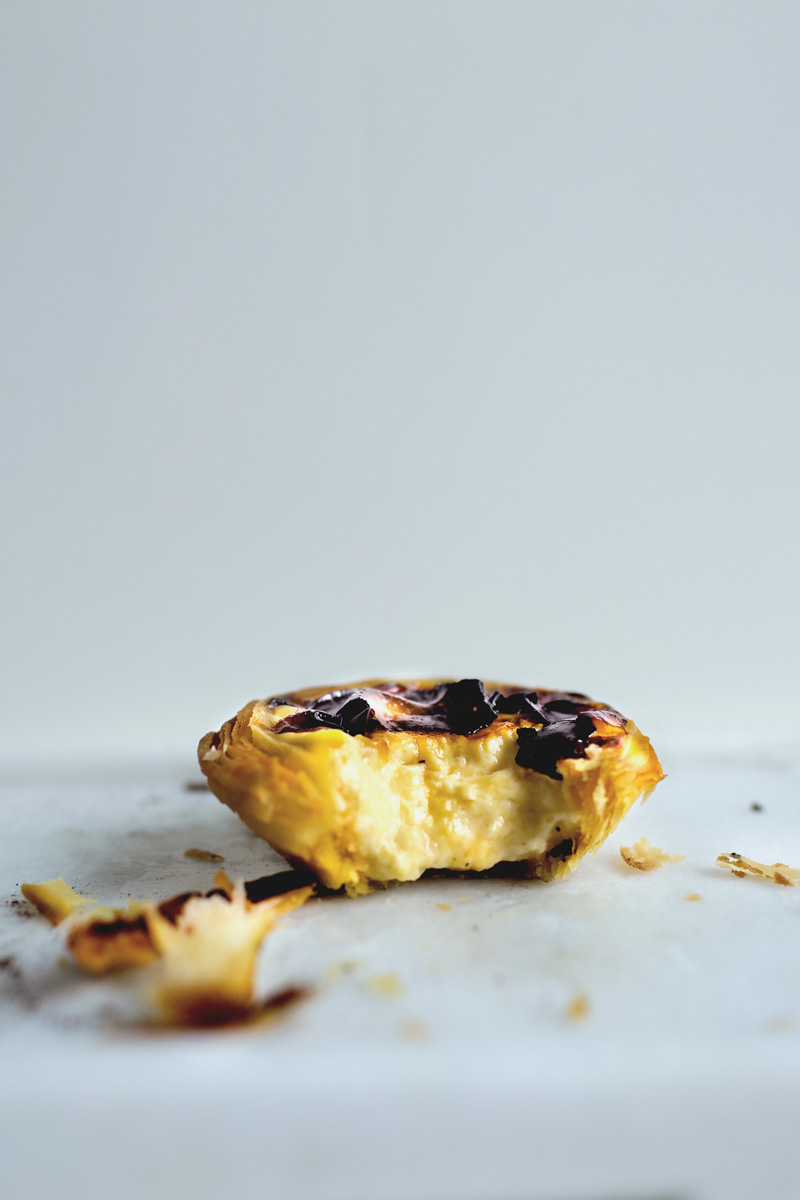
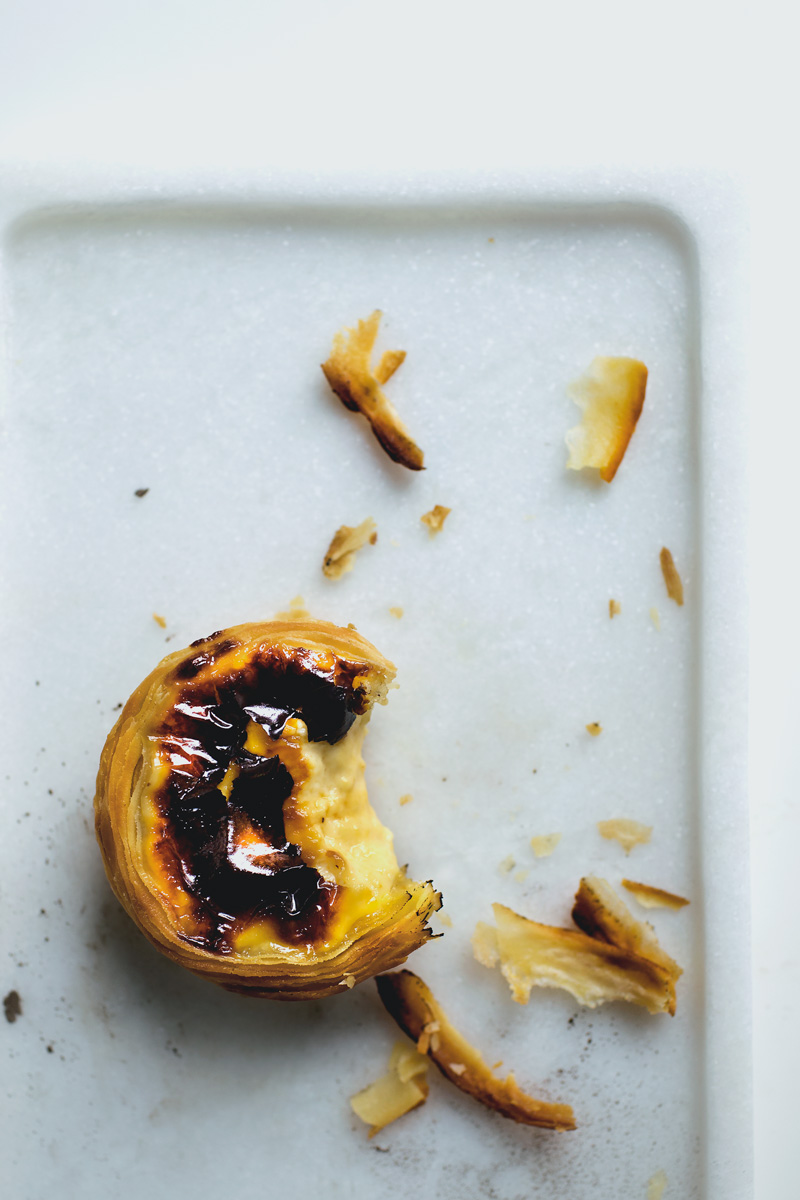
First of all, I must stress on the “textural” part, because at a glance, Portuguese pastel de nata looks extremely similar to its cousin in Macao. But once you bite into it, things get interesting. In Lisbon, the pastel de nata has a significantly crispier shell that shatters more briskly upon impact; whereas the Macao’s tart-shell resembles more as puff-pastry, perhaps more delicate but with a less satisfying crunch. Custard wise, Lisbon’s has a denser and more thickened filling that for me, can be overbearingly sweet at times; whereas Macao’s filling is more supple, with a flan-like texture that wiggles.
Which one do I like more?
Can we ask a less complicated question like how do we actually put Matt Damon on Mars?
I assure you that this conclusion, whether you agree with it or not, came after much torments, self-reflections and even some soul-searching on who I am as a sentient pastry-eater… But, I have made my choice, or, more of an answer to my own question if you will. What is, ultimately, a perfect pastel de nata?
Well, as it can only be, a hybrid.
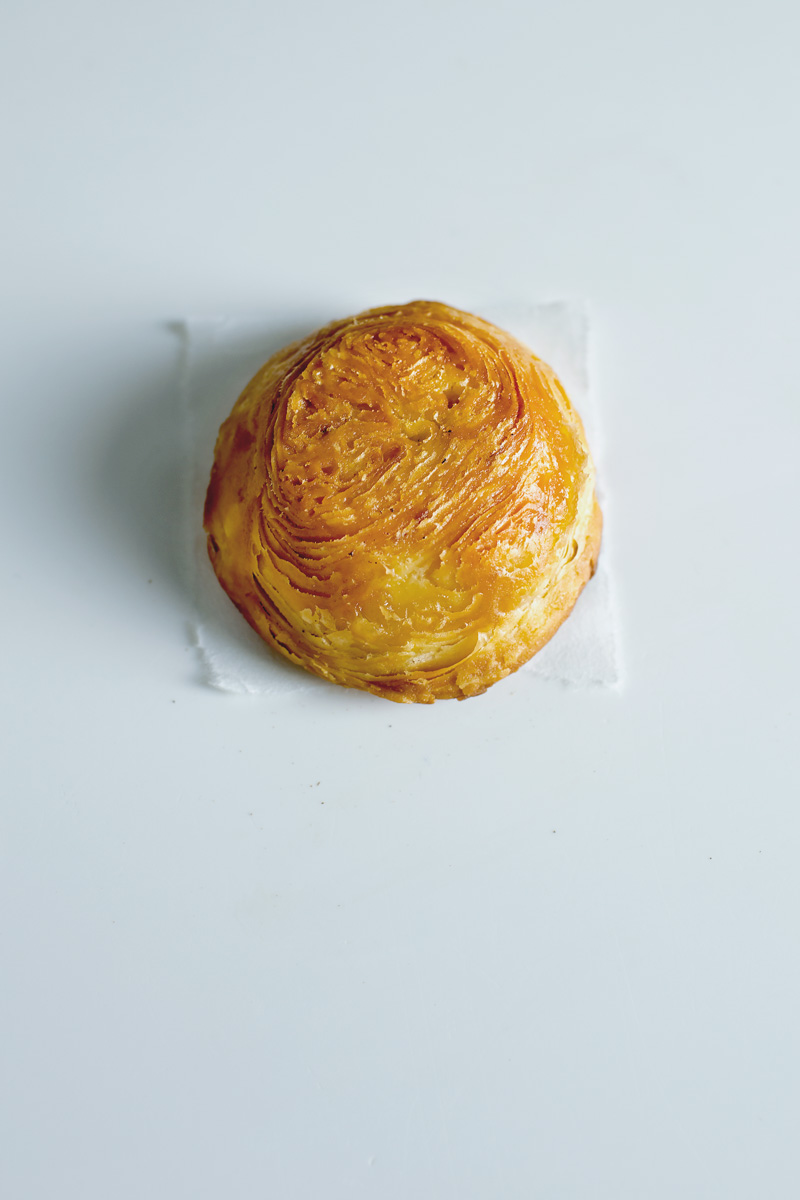
A strategically modified combination that embodies all the best parts in both worlds. First, the audibly crispy tart-shells from Lisbon, which cannot be substituted with store-bought puff pastry and must be hand-made, but fortunately, can be easily done as long as you have a pasta-machine. That’s right, a logical extension to my pasta-machine cruffins, which allows anyone to make a super shattering laminated dough without any folding, re-folding, or any mid-process chilling in between. In fact, you can finish making this dough in under 2 hours. Then for the custard, it now steers towards the Macanese version, with that gently sweetened, wiggly and flan-like filling that I’ve grown too attached to switch sides. Compared to Lisbon’s, it uses less flour to thicken, with a mixture of whole milk and heavy cream to reach that perfect balance between decadence and lightness.
I started the first step at 3 pm, and by 7 pm, coming from the deep end of the kitchen, there was one impolitely loud crunching sounds after another. The laced tart-shell cracked through its own maze-like layers. The custard was steaming hot and fluid, almost suckable as I tried to master such art without burning my lips. I practiced my upmost restraint to leave a few untouched, and was delighted to find out in the next morning, that the crispiness and awesomeness remained.
Perfect pastel de nata? Well, if you’re asking me, fucking hell yeah.
Adapted from many recipes combined. You'll need a pasta machine for this recipe.
Ingredients
- 1 cup (240 grams) whole milk
- 2/3 cup (160 grams) heavy cream
- 3 tbsp (45 grams) granulated sugar
- 1 1/2 tbsp (12 grams) flour
- 3 large egg yolks
- 3 tbsp (57 grams) sweetened condensed milk
- 1 tsp pure vanilla extract
- 8 tbsp (113 grams) unsalted butter, room-temperature
- 1 cup (146 grams) all-purpose flour
- 1/2 tbsp (7 grams) unsalted butter
- 3/4 tsp salt
- 5 tbsp (76 grams) water
Instructions
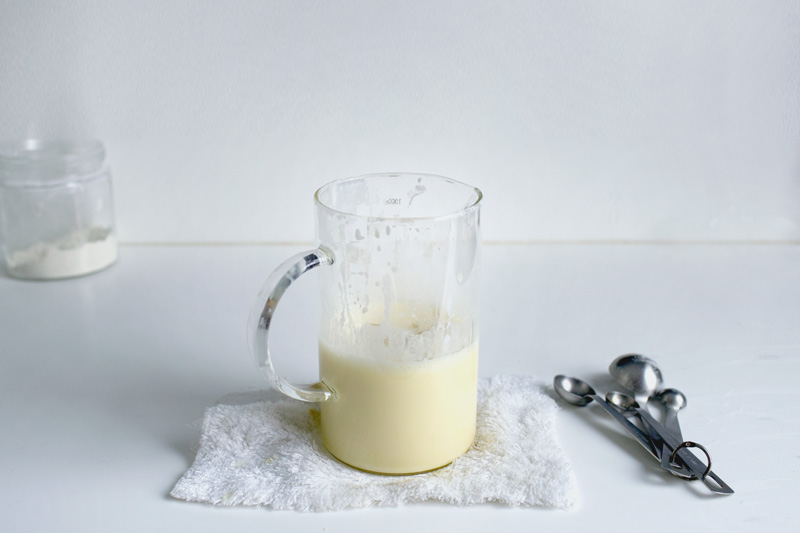
- MAKE CUSTARD: Combine milk, heavy cream, granulated sugar and flour in a pot and set over medium-low heat. Whisking constantly and cook until the mixture starts to simmer and thickens slightly. Turn off the heat, and continue to whisk for 2 more min to make sure it's lump-free, then set aside. In an easy-to-pour container, whisk together egg yolks, sweetened condensed milk and vanilla extract. SLOWLY pour the hot milk-mixture into the yolk-mixture (so you don't scramble the yolks), whisking constantly, until evenly combined. Cover and chill in the fridge for at least 2~3 hours until cooled. Can be made the day ahead.
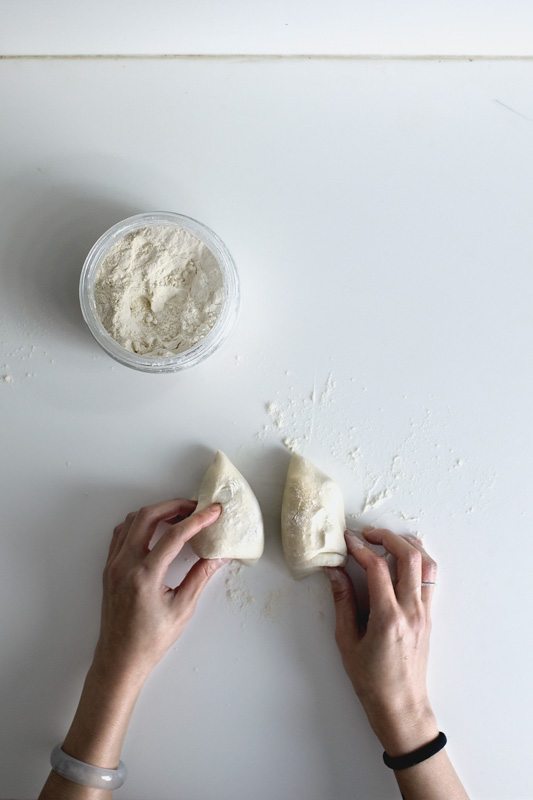
- MAKE TART SHELL: It's important that the butter is completely softened to room-temperature. Placing cold butter (cut into chunks) in the oven with the lights on for about 1 hour, does the trick for me. Meanwhile, Knead together all-purpose flour, 1/2 tbsp unsalted butter (this is separate from the 8 tbsp), salt and water, for 3~5 min until a smooth dough forms. The dough should be soft and very supple, but not sticky. If your feel the dough is too dry/hard, wet your hands and knead the extra moisture into the dough. Wrap it with plastic-wrap and let rest in the fridge for 1 hour.
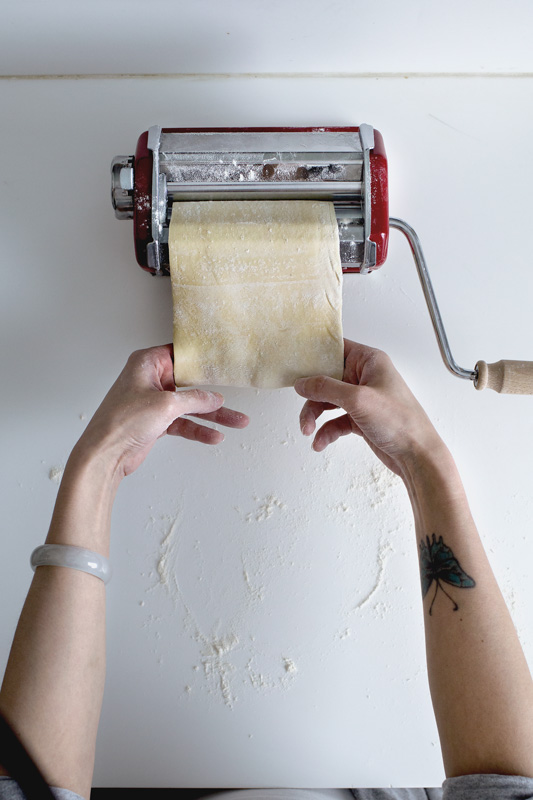
- After resting, dust the dough and the working-surface well with flour, then cut the dough in half. Roll the first portion out so it fits the entire width of your pasta-machine, then pass it through the machine on the thickest setting. Dust it well again with flour, then feed it back to the machine, but this time, loop one end over the other and press it down so they stick. You're creating a "conveyer belt" so to speak, which allows you to finish rolling the dough without re-feeding it back to the machine. Now, keep the dough well dusted with flour inside-out the whole time, and keep rolling it until you've reached the thinnest setting.
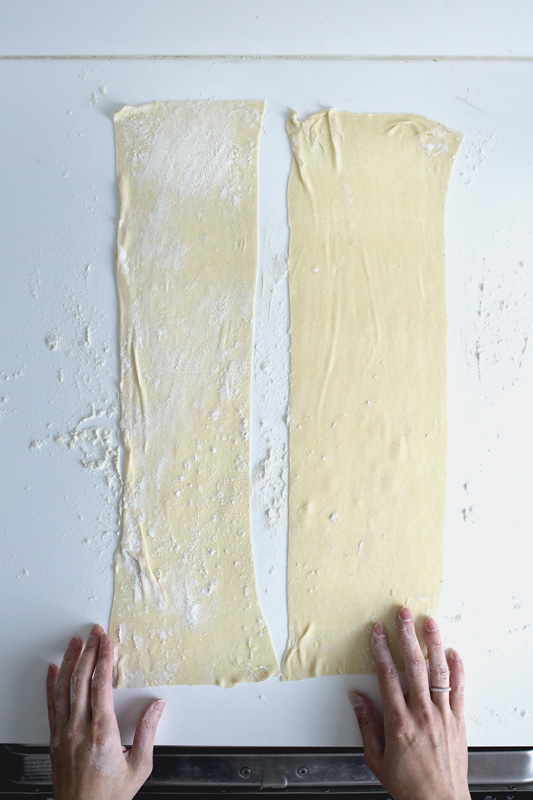
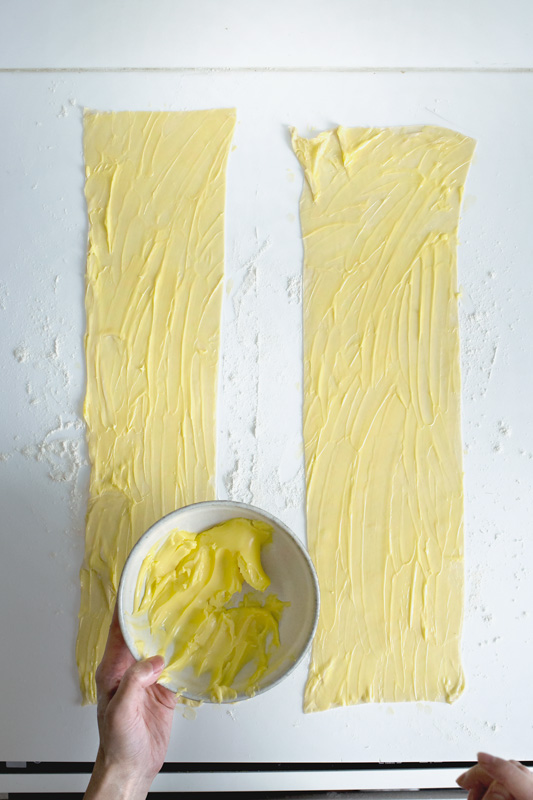
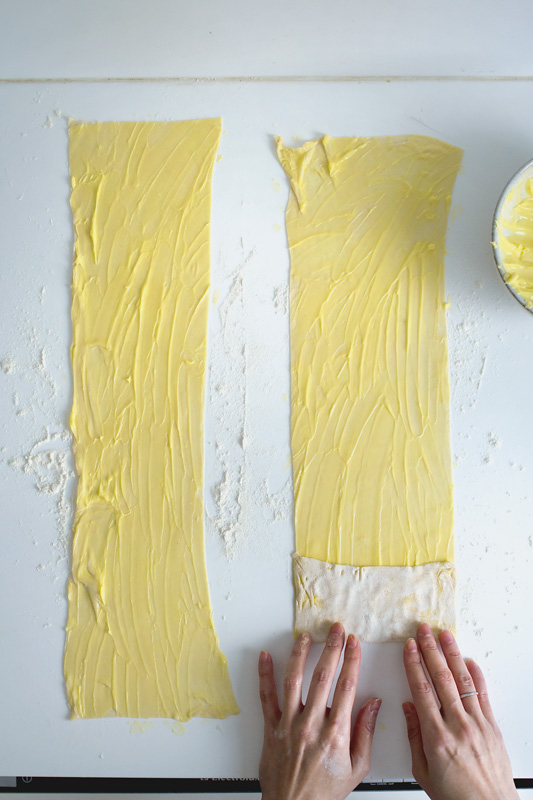
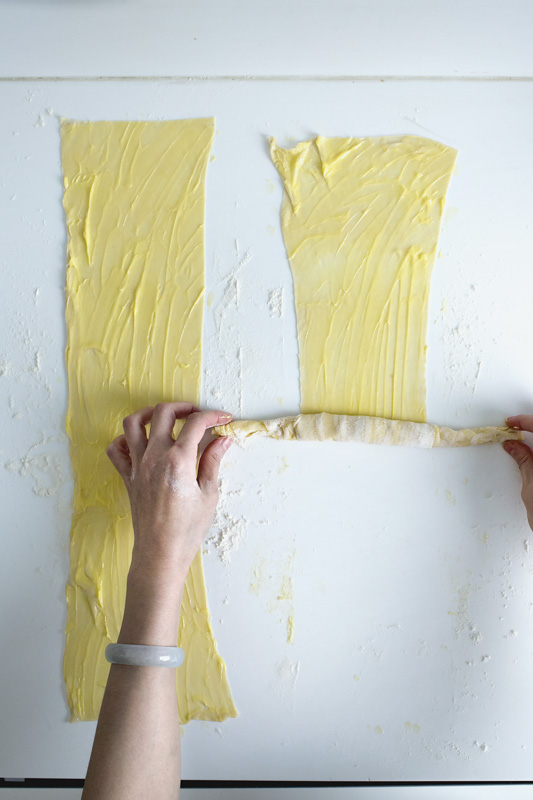
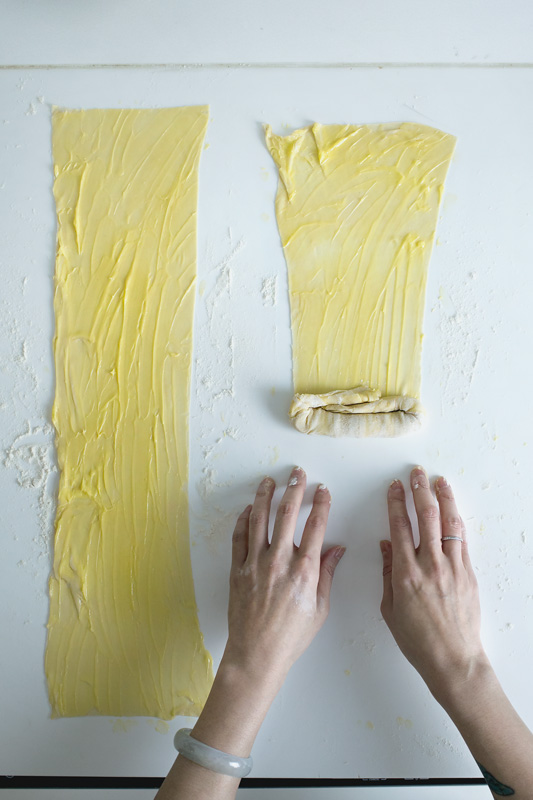
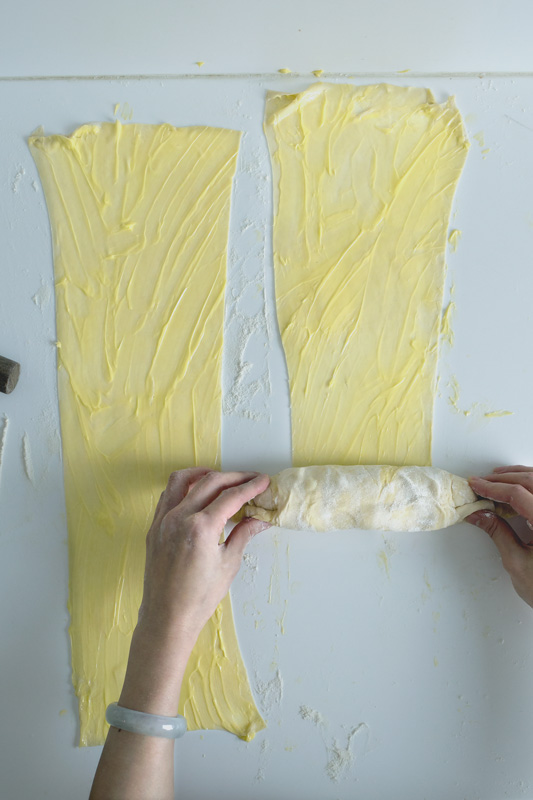
- The dough will be very delicate at this point so work gingerly. Cut the dough near the pasta-machine then roll to release it, then cut again length-wise in half (or if you had a super long counter-top, you can keep it whole). Lay them flat on a well dusted counter-top, then use your fingers to spread 1/2 of the room-temperature butter evenly across the entire surface. Start rolling the dough from one end to the other. You'll notice that in the beginning, it forms long tapered tips on both sides (see photo). Once they get too long, simply tuck in both tips and keep rolling (see photo). Once you finish rollin the first sheet, place it over the second sheet and keep rolling. While rolling, gently pull the log towards you to get a tighter roll.
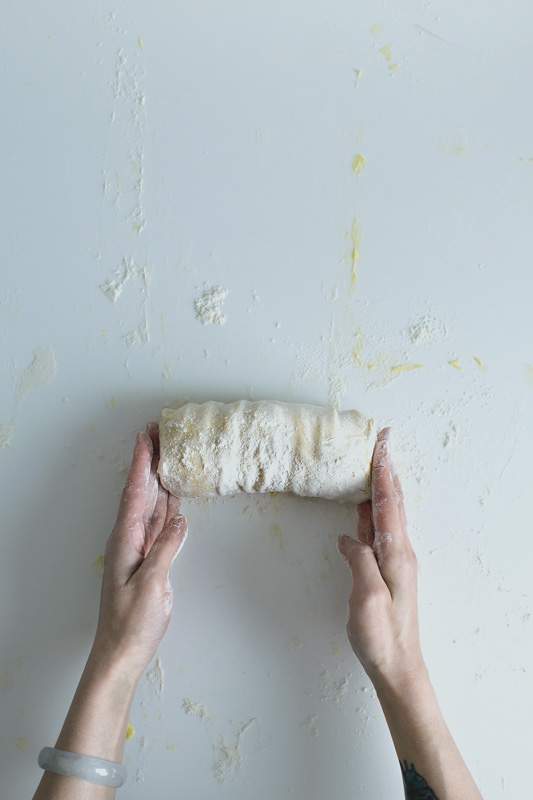
- Wrap and chill the first log in the fridge while you repeat with the second portion (see NOTE on doing it in one go). Same steps, roll it to fit the width of the machine... make a conveyer belt... roll to the thinnest setting... cut and release... then rub the remaining butter evenly across. Now take the first log out of the fridge and place it on one end of the new sheet, and roll again. You'll notice that the sheet tends to gather at the centre of the log. Don't worry. Simply push the tips in and use your hands to push/smooth the dough from the centre towards the tips to make it even (see photo). Wrap and freeze the log for 1 hour until hardened. Periodically, take it out and roll it to get it as round as possible.
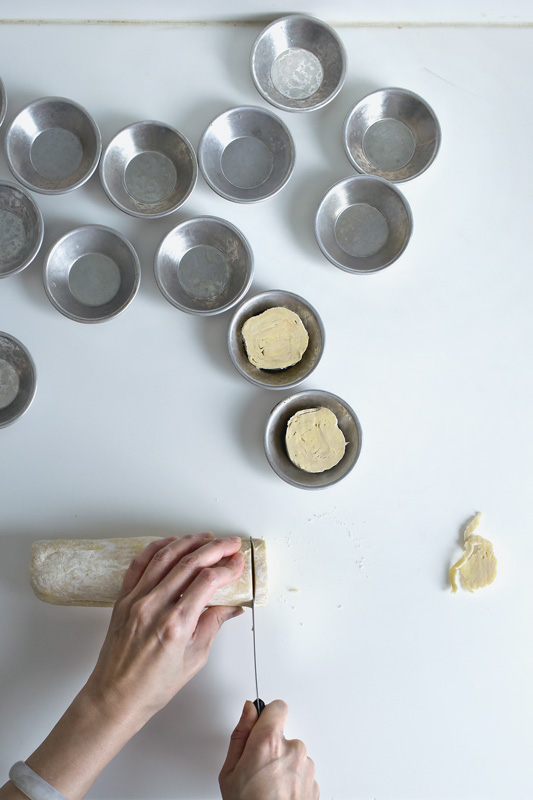
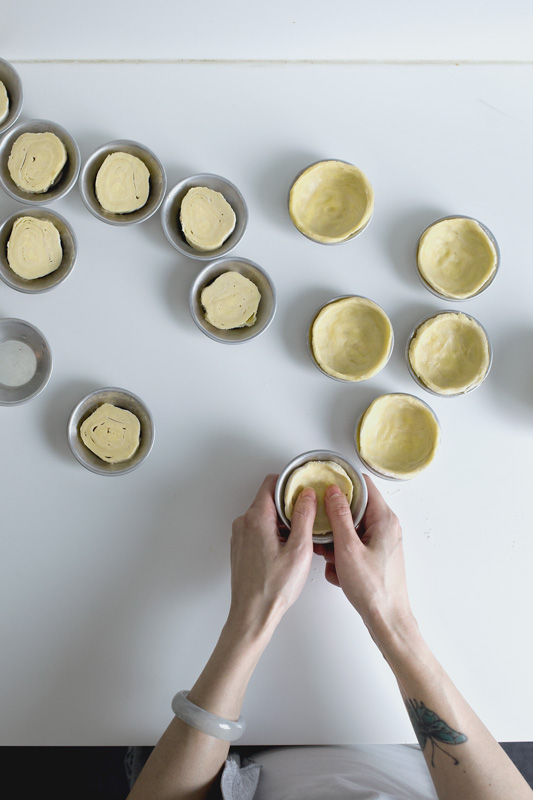
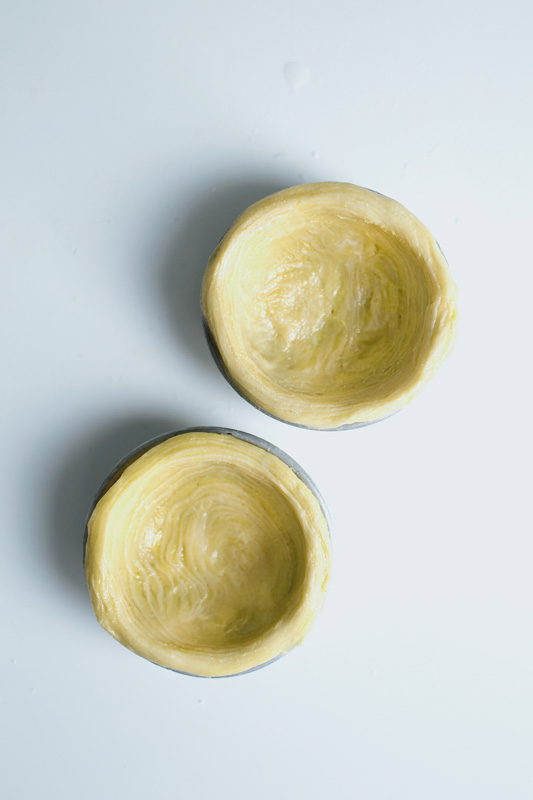
- The trick to shaping the tart-shell is to cut the log while it's cold, but shape it once it's softened slightly so it stretches well without cracking. So, remove the tips of the log, then cut into 12 disks about 1/3" (8 mm) thick then place in the centre of the tart mold, and wait for 10 min to soften. Dip your thumbs in water, then start by smoothing the cut-side of the dough outwards to fit the mold, then push it from the centre outwards until the dough is pushed up slightly higher than the rim of the mold. Aim for a thinner bottom with a thicker rim. Dip your thumbs with water whenever it sticks, and repeat with the rest. Once finished, flash-freeze for 30 min to harden (or keep in the freezer until needed), and *preheat the oven on 500 F/250 C.
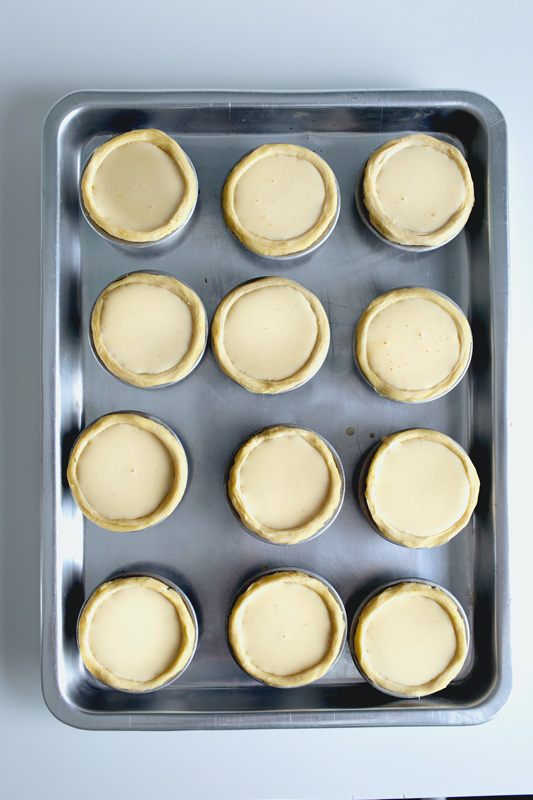
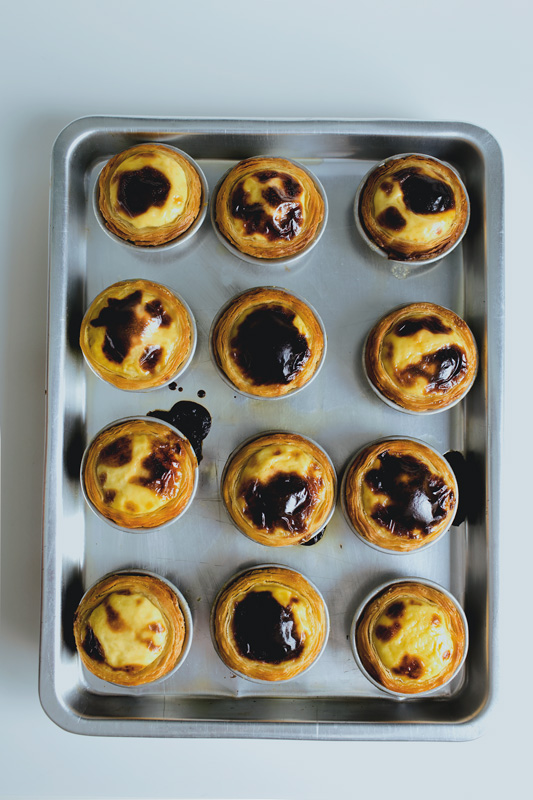
- Place the mold on a large baking-sheet that allows them to loosely fit. Pour the custard into the shells to fill them all the way to the top, then bake on the middle-rack of the oven for 10 min. Then switch to top-heat (if available) and bake for another 5~7 min until golden browned and caramelised.
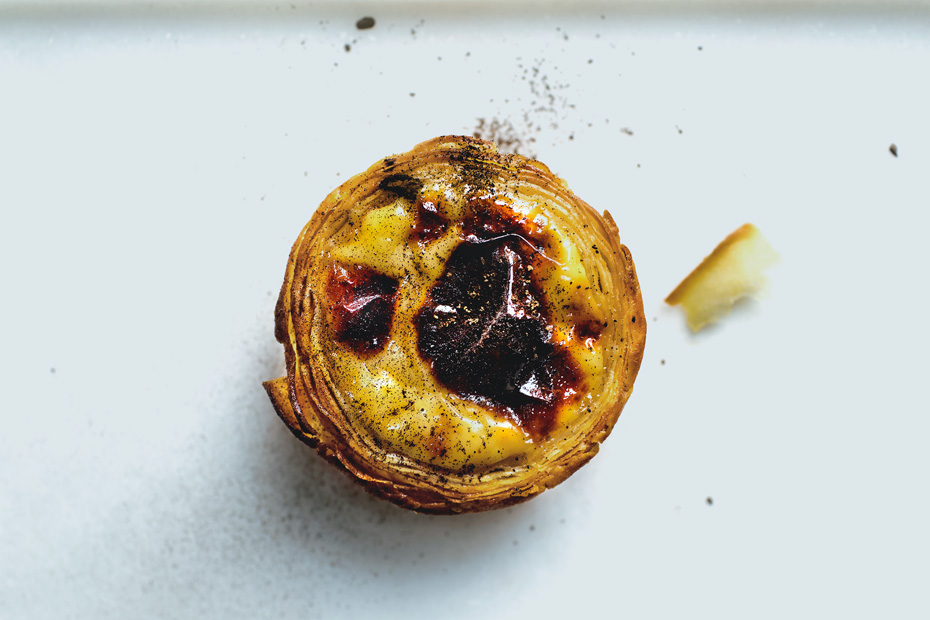
- Let cool inside the mold for 5 min, then transfer to a cooling-rack. They're fantastic while hot, and still fantastic once cooled. Dust with cocoa powder or ground cinnamon if preferred.
Notes
I divided the rolling/buttering of the doughs into 2 steps because I have limited counter space. If you had a large counter space, you can roll both portions of the doughs out all at once, butter them in one go, then make the log.
You can also bypass making the tart-shell yourself, and just use store-bought puff pastry. But it won't be as crispy, and it becomes soggy faster.
Vasun
02.24.2016at7:20 PMOMG Mandy…Amazeballs! These need to be in my belly asap!
Aimee @ twiggstudios
02.24.2016at7:37 PMWow these look amazing I have made them before but I have not been able to get the blistered tops yours look the the real thing can’t wait to dry the recipe xxx
Lia
02.24.2016at7:45 PMWow!!!
They look incredible and just as perfect as the truly delicious proper ones that we eat in Portugal (well, they’re not perfect and delicious everywhere…)!!
Congratulations!!!!
Im portuguese and Im trying for so long to achieve that perfection pastry wise and never did…
Ill try your method for sure now!!
Thanks a lot for sharing with such amazing detail.
Lia
Jessica
02.24.2016at7:57 PMthis is unbelievably gorgeous. layers on end!!!!
Jill Shepherd
02.24.2016at8:24 PMGrrrrrrrr… my diet really hates you. But my mouth, and my husband, love you so, so much. I’m still recovering from the orgasmic Crack Slurp we tried 2 days ago and now I have to make freaking egg tarts! We had an exchange student from Hong Kong a few years ago and we tried making these together. If that is what they were supposed to look like, I am mortified now.
Mahy
02.24.2016at9:51 PMSeriously I admire the experiment and what fabulous luscious results! Love reading your posts–always!
Katrina @ Warm Vanilla Sugar
02.24.2016at10:09 PMEverything about these tiny tarts is impressive. Love the custard and love the pastry! Dying to make these!!
Aimee @ Food Banjo
02.24.2016at11:29 PMI’ve never had these, but they look SO good! And I’m so glad you included step-by-step photos of the pasta making. I may have to attempt these in the next few weeks!
Ruth
02.24.2016at11:39 PMOooooooooh! When we went to Macau, we had to do the taste test between Margaret’s and Lord Stowe’s egg tarts. The two of them used to be married and, after the divorce, they set up their own rival bakeries. Margaret’s won, but not by much. My Portuguese friend made them for me once, and as you said, they’re different. Really looking forward to making these! Xie xie!
Martin Jr
02.24.2016at11:57 PMAlways wanted to make Portuguese egg tarts! Thank you so much!
J.S. @ Sun Diego Eats
02.25.2016at1:43 AMYESSSS. I think I like the crackly blistered top of the nata but the cool, slightly panna cotta-esque guts of the Asian egg tart. So this is quite nice. But I would drown it in cinnamon.
Adrianna from A Cozy Kitchen
02.25.2016at4:01 AMThese look so incredibly beautiful.
Fernando
02.25.2016at4:26 AMgorgeous as always, mandy!
Chelsea | Whole Bite Blog
02.25.2016at4:46 AMThis looks UNREAL! So beautiful, so delicious, so genius! Amazing work, lady :)
Kate
02.25.2016at5:16 AMThese look amazing. Can you make the pastry shells without a pasta maker?
mandy@ladyandpups
02.25.2016at12:28 PMKate, then I’m afraid you’ll have to do it the old-school way of folding – chilling- then refolding (like puff pastry), which I haven’t tried doing.
John Magnet Bell
02.25.2016at5:33 AMYes, not only are they a thing in Portugal, but very much a thing throughout the ENTIRE country (I should know, I was born and raised there), not just in Lisbon. I had no idea there was a Macanese version. Looks yummy! And congrats on the photos — not only do they provide a handy visual guide but are also quite good photos — and dare I say it, rather appetizing.
Kara | Sorghum and Starch
02.25.2016at7:41 AMThese are glorious.
mindy
02.25.2016at8:59 AMWHAT A LABOR OF LOVE! thank you so much for this terrific lesson. They make me think of other doughs: in Chinatown they do a lard dough with layers like this- for curry beef turnovers; in Italy, sfogliatel are terrific and layered like this-triangular ‘3 corner hats’ filled with ricotta and candied fruits.
Prudence Marule
02.25.2016at3:18 PMOk,ok, so when i saw all that folding and rolling and re-rolling i asked myself if that was all necessary and then!.. i saw the sun kissed baked product and the sumptuous layers and i understood! Also very interesting history, i had no idea the origins of these yum-tastic bites or that it wasn’t necessarily Portuguese!!.. cant wait to try them!
russ
02.25.2016at8:38 PMThese look superb can I just clarify one stage;are you saying you complete one ‘log’ fridge it and then take it and wrap the new sheets around the unfridged dough.So the final dough to be cut is a sort of Russian Doll creation rather than sandwiches of pastry;sorry to be dim.
mandy@ladyandpups
02.25.2016at9:21 PMRuss, yes, if I understood you correctly, that is correct. The separated step for rolling is really due to limited counter space. If you very large counter, you can roll out both portions of the dough at once, butter them at once, then roll them all in one go.
Sabrina
02.26.2016at10:43 PMThese look fantastic! I love how much the custard caramelized on the top. Also thanks for the step-by-step photos :)
Susannah I. Sherwood
02.27.2016at3:23 AMThe science of cooking, along with its arts, combine in such exciting ways through your thinking, words, and exactitude. I’ve recommended your work many dozens of times because you never cease to inspire. A giant thank you!
Tami
02.27.2016at10:57 AMCustard is cooling, pastry rolled, buttered and rolled again, just waiting, waiting, waiting for next step then it’s all systems go . . . . can’t wait☺️
Tami
02.27.2016at1:47 PMThey’re out of the oven, tiny little morsels, yummy but slightly salt. Might leave out the salt next time. Thanks for such an educational recipe, love learning new techniques and now I’ll try the cruffins!
mandy@ladyandpups
02.28.2016at1:12 PMTami, too salty? That’s strange. I would still use 1/2 tsp in stead of no salt at all. The pastel de natal in Lisbon had a slight saltiness on its crusts. Glad you enjoyed them!
David
02.28.2016at5:48 AMMandy,
Very smart and clever as per usual. How many settings thinner did you go on the pasta machine settings? Good to go…
mandy@ladyandpups
02.28.2016at1:11 PMDavid, there are 6 settings on mine and I went to the thinnest, 6!
ellie
03.02.2016at6:26 AMI too have wondered what egg tart really was originally….as my favorite EVER pastry at 85 Degrees bakery is the mochi egg tart!!! omgsh. I make it once in a while on a whim and with no real recipe, which means it’s not always perfect but really satisfies the eggy custardy craving I harbor for days. This is wonderful because of your cruffin adaptation!!!! I tell myself i need to make pastries with the pasta maker but for some reason never do–probably the laziness of taking it out and connecting it to the mixer. :P
Maëva
03.03.2016at5:06 PMOh my word! It looks so yummy and creamy and rich.
Definitely a lot of work though, I’m the lazy kind…
Dita
03.07.2016at12:53 AMHi, Mandy.. This recipe is such a revelation. Thank you so much for sharing it. When I saw this on your Instagram I know I have to give it a try. I’m just wondering, is it ok to use muffin tin instead of individual tart mold? Since it’s the closest thing I have on hand right now.
Yvonne
03.07.2016at2:48 AMMade these tarts today. Great recipe. So many layers! Thank you Miss lady and pups
Rob Connoley
03.08.2016at7:31 AMSuch clear instructions – thank you! I’ve attempted these many times but they’re never quite right. I’ll give this a try tomorrow.
คลิปโป้
03.08.2016at4:02 PMYour style is very unique compared to other folks I’ve
read stuff from. Thanks for posting when you have the opportunity, Guess I will just
book mark this blog.
Kay
03.13.2016at3:35 AMMandy, those tarts looks amazing. I definitely love the hybrid version more then the actual Portuguese tarts!!! They’re lighter and custard like. Have you try working the dough with a pin roller instead of the pasta maker. And what size tart mold did you use.
Hind + Jun
03.16.2016at2:29 AMHave always been terrified to make these but they are my absolute FAVOURITE dessert in the whole world. If I ever attempt – it will be your recipe I’ll use – thanks! :)
คลิปโป้
03.17.2016at11:13 AMGreat blog here! Additionally your site rather a lot up very fast!
What host are you the use of? Can I am getting
your affiliate hyperlink on your host? I want my web site loaded up
as quickly as yours lol
Vanessa
03.31.2016at1:42 PMMade these today. Doubled recipe but otherwise made as written. PERFECTION. Thank you so much.
Avery
04.15.2016at10:35 PMPastel de natas without folding?? I’m in!
Where I come from (Singapore), we call these Portuguese egg tarts (they’re really famous in Hong Kong too!).
Definitely a fantastic recipe! :)
Nicole
05.10.2016at12:47 AMWhat molds did you use for these?
mandy@ladyandpups
05.10.2016at12:36 PMNicole, I just used simple tart hold
Evangeline
05.14.2016at11:34 PMThis is pure genius!!
Pearl
06.06.2016at12:39 AMHi Mandy, thank you so much for this recipe. I’ve been looking for the perfect Macau-style egg tart recipe for a while.
I made the custard yesterday and was confused when you wrote “cook until the mixture starts to simmer and thickens slightly”. Can you define what you mean by slightly thick? Does the test of a custard coating the back of a spoon and a clean line left behind when swiped with a finger apply to your recipe? Or is yours like a watery gravy? Mine ended up being quite runny because I wasn’t too sure what consistency I was aiming for and didn’t want to overcook.
Any clarification would be helpful. Thanks!
mandy@ladyandpups
06.06.2016at1:08 AMPearl, coating the back of spoon sounds about right!
Rebeccah
06.11.2016at9:11 PMHello, can anyone recommend somewhere in Hong Kong to buy the Portuguese versions????
Kristy
06.25.2016at8:33 PMIt’s 8pm where I am. And I made the mistake of not calculating exactly how much time I’d need, so my dough is made and in the fridge, I don’t think I’ll have time to finish rolling them out and freezing them before baking tonight.
Can I leave the dough to rest overnight? What might happen to it if I only roll them tomorrow morning?
mandy@ladyandpups
06.26.2016at3:40 AMHi kristy, since this is not a yeasted dough, I’m pretty sure you can leave it in the fridge to rest overnight, then carry on tomorrow :)
Kristy
06.26.2016at11:05 PMThey turned out great!
Although my dad said the crust was a tad hard. Maybe I over-worked the dough?
Also, I rolled them out thin with an old-fashion rolling pin.
mandy@ladyandpups
06.27.2016at12:17 AMKristy, haha that’s probably why, cuz the dough wasn’t thin enough :)
Chris
07.25.2016at3:44 AMHi mandy,
another recipe of yours I tried and another one that is perfect. I was already amazed of the vampire slayer ramen and I am sure all your other recipes standing on my list will turn out great too.
Thanks for the best food blog I know and greetings from Germany
Chris
Ganda
07.29.2016at7:06 AMYes, yes yes, after having spend weeks watching five hundred (at least!) videos on how to make this Pastel de Nata, reading an entire internet (at least) worth of recipe and blogs- and spending all day in the kitchen trying to make this cake from what seemed to be the most common recipe- and being confirmed in what I believed : puff pastry, homemade or store bought can NEVER be as crispy and crunchy as the real thing you get in Portugal! I lived there and traveled there for years and ate a ton (yes, at least!) of those wonderful cakes- also the real deal from Belem and from Aloma- and been obsessing with cracking the code of how they get it so crispy, flaky and crunchy. And I was sitting here wondering why no one, and I mean NOONE noticed that the real deal is NOT made with puff pastry- and there are like five billion recipes out there! Finally someone who understands, thank you, I was beginning to think I was living in the twilight zone!!
I will try your pastry this weekend, very excited;)
Ps.But I have to say that the recipe for the cream filling that resembles the ral thing the most are those where you mix milk with starch ( flour or corn starch), boil it with a lemon peel and a cinemon stick, mix it with a sirope of sugar and water and when cooked down mix in lots of egg yokes. It really worked the best.
Lisa Garcia
12.11.2016at12:12 PMHi Mandy. Wow… a bit of context: it’s 3h04 am while I write this and I’m sitting in my home in Portugal. I live in the Azores but lived in Lisbon for many, many years. I can’t begin to tell you how amazed I was to see Pastel de Nata in your blog, a blog I just discovered while I was surfing away in the net with no clear destiny. When I laid my eyes on those terrific photos of Pastel de Nata, I was confused for a moment – “wait, isn’t she asian?!”. :-D Your Pastel de Nata looks exactly like the real deal! And that trick with the pasta machine… well, that’s enlightened technique right there. Can’t wait to try it.
P.s. – Checked your post on Lisbon also. You painted a great portrait of Lady Lisbon, both in words and pictures. And I could almost hear the Fado on the background…
mandy@ladyandpups
12.11.2016at3:20 PMLisa, I miss Lisbon! And I put together a fado playlist just to scratch the itch now :)
Ogi the Yogi
06.06.2017at11:47 AMThis is a fascinating technique, very different from the more traditional three fold and rotate 90 degrees, like the culinaria recipe.
For some reason this process seems more intimidating than the fold and fridge for croissants, I am not at all comfortable using a pasta machine.
I absolutely love these and miss them so much, can’t find these anywhere in the US.
Ogi the Yogi
06.06.2017at1:01 PMCan you please tell me what this process of dough or tart shell is called? I have never seen or heard of softened butter being spread, almost like a phyllo dough except with a lot of butter! I can only find recipes using chilled butter to make pastry.
mandy@ladyandpups
06.06.2017at1:51 PMOgi, it’s just a process I came up with. You can call it Mandy’s laminated dough :)
Mr Lam
06.25.2017at2:52 PMExcellent recipe! When I start pushing the dough in the mold, the lining somewhat disappears. Once I take it out of the oven, the shell doesn’t have the layers like you do. Any tips on what may be causing the issue?
mandy@ladyandpups
06.26.2017at5:35 PMMr Lam, I could only think of one reason and that is because the dough got too warm? Otherwise I have no idea. Did you have the layers before you push it out?
Mr Lam
06.29.2017at12:30 AMHey Mandy, thank you for responding!! I’ve been stuck on this for several batches. I believe the issue I’m having is after I spread the butter in the dough and roll then freeze. When I take out the roll from the freezer, I notice butter is still hard. Here’s a picture of the dough (https://ibb.co/gJvgdQ). Once I wait a little and start molding, I notice the butter is still clumpy, but at the same time I’m trying not to wait until the dough is too soft. (https://ibb.co/fEQxJQ)
mandy@ladyandpups
06.29.2017at12:42 AMYou have to let the dough soften a bit before pushing, otherwise it will crack! Did you roll the sheet to the thinnest setting on a pasta machine? Because the layers look way too thick. The sheet of the dough you rub butter on has to be paper thin.
Kevin Lam
08.06.2017at12:18 PMGotcha! The lines look alot better now. The only problem I have now is that when I put the tarts into the oven, the dough shrinks and the egg tarts start overflowing due to the heat. Any advice? Is it because I’m not resting the dough long enough?
mandy@ladyandpups
08.09.2017at1:01 PMKevin, sorry for the late reply! I don’t think it’s about resting because u need to chill the shell before pouring the filling, and that’s enough resting. I try to shape the pastry slightly taller than the mold to account for the shrinkage. Another thing worth trying is perhaps using cake flour for the dough to reduce the gluten. Hope this helps!
Nicole
12.03.2017at9:07 AMJust made these. Fantastic. A bit fiddly but that was part of the enjoyment of making them. And they worked perfectly, terrific custard, shatteringly crisp pastry.
tony dickens
12.29.2017at8:34 PMto really round out your pastel-de-nata experience, you need to travel to Rio de Janeiro centro and go to the national colombian bakery in centro or at the one on the extension dining area at fort copacobana — the arm that extends into the ocean and you sit ocean-side looking back at the Rio skyline. Anyhow, the portuguese took their secrets to Rio as well and the filling is a golden semi-fluid filling with the same delicious crusting. Ive been to Lisbon and Rio — and they are slightly different — each with their own amazing addiction. For me its an even heat – comparing the wonderful colony nata to the home country nata. Cant wait to go back to either.
Elan
02.01.2018at9:39 PMYou know these look more like the ones from Belem, I don’t know if you tried those. But they are way less sweet than the pastel de nata, ticker and more wobbly flan like texture inside. After having the original version form the recipe made by the monks have tried to achieve without success similar more similar.
Kathy
02.03.2018at8:08 PMHi Mandy, i tried to make the custard tarts, the filing was good but the bottom pastry base seems a bit greasy and undercooked…i put in the middle of the oven and cooked for 13 mins, is there something not right?
mandy@ladyandpups
02.03.2018at8:47 PMKathy, Hm, I’m not sure. does your oven use top or bottom heating? If it has bottom heating, try putting the baking sheet right on the bottom of the oven for the first 7 min to crisp up.
Kathy
02.05.2018at1:50 AMHi mandy, yes i had top and bottom heating, so that means the first 7 mins put the baking tray to the lowest and then put back in the middle rack to cook another 8 mins? I also have the problem when baking egg tarts, the appearance looks good but when cut it in half, the middle part of the pastry base undercook….
mandy@ladyandpups
02.05.2018at1:17 PMKathy, not on the lowest rack, but the BOTTOM of the oven, directly. And I highly suggest getting an oven thermometer for your oven just to make sure the temperature is correct :)
Hilary Santos
03.07.2018at12:11 PMHi Mandy – what a great recipe! Thank you so much – my family loves these and now we can all make them at home when I get your method perfected.
I was really getting very messed up trying to roll the whole dough ball gradually as this was my first time to use my new pasta machine. It was a timely gift that arrived when i was trying to do this dough by hand.
I found that if I cut the dough into quarters and rolled them into rectangles the width of the machine then I could pass each of them through the narrowest setting ( my machine has 9) in one go.
I also found catching the thin dough strip with one hand while cranking with the other very awkward as it tended to fold on itself and needed constant stopping and straightening.
I cut long narrow pieces of silicone baking paper, pushed them through the back of the machine to catch the dough strip and eased them forward while cranking, and ended up with the strip on the paper, ready for buttering and easily moved on the counter top. I folded the sides under to fit the machine , then spread them out when it came to buttering the dough. I mention this for anyone else struggling to manage the dough.
My first batch seemed too oily as the butter melted out into the muffin cups and even pooled in the bottom of some cups, so i reduced the butter in the second batch – big no-no fellow readers – the taste just wasn’t the same and the pastry was dry and had a slightly floury taste. My third batch went back to the recipe but I added more water to the dough and got a better texture.
My main problem is that despite heating my oven for an hour beforehand as suggested by another website and baking on the lowest rack the pastry is not browning on the sides and bottom like your pictures, even after extending the baking time. The tops are golden but the sides are very pale. A lot of butter bubbles out during baking and the tarts are rather oily when cooked. Only the 2 most outer layers are crispy and the inner layers are firm but not crisp.
I chill the dough in the cups while preheating the oven so they are very cold going into the oven and the custard is cold too. The cups are 3 inches across and 1 inch deep. The butter I’m using is Westpro from New Zealand.
Have you any suggestions to remedy the oiliness? I got most of the butter onto the strips but not all and it still seemed quite thick. I had about 2-3 tablespoons left over.
I did think of painting them inside with an egg wash and baking blind for 2-3 minutes -or longer if they don’t puff too quickly- to waterproof the shell and then adding the custard and will try this next batch. Have you tried this?
mandy@ladyandpups
03.07.2018at12:41 PMHilary, Thanks for all the feedback!! I’m not sure the egg tarts turned out different, but a few things I would check is 1) Use an oven thermometer to make sure your oven is at the right temperature. 2) bake the tarts on the very bottom (not on a rack) of the oven first to crisp up the shell, then move them up under the broiler to brown the top. 3) the dough may not be thin or wrapped tightly enough, so make sure you stretch it a bit to get it as thin as possible, and don’t cut it too thick either. I hope these will help :)
Louisa Sadiq
08.11.2018at2:57 AMI made them today. They are lovely, the pastry is great. I love the lamination. However the texture is not like the traditional pasteis da nata. The filling is more like a plan consistency. But still very nice just not traditional. Thank you for the lovely recipe and all the step by step info.
Louisa Sadiq
08.11.2018at2:59 AMSorry I meant the filling is like a “flan” consistency.